Monthly Archives

December 2015

Seasonal

Recipes for all your Christmas goodies

christmas goodies recipes

Bree here, from Home Zone Furniture.

During the month of December, I can most likely be found in the kitchen. From stir-crazy kids to prepping for holiday parties, I’ll be whipping up cookies, candies and treats of all kinds to keep everyone happy and sugar buzzed. This Christmas, forge traditions of creativity, fun and togetherness with these delicious—and beautiful—treat recipes!

COOKING WITH KIDS

Kids love anything having to do with Christmas treats. These goodies are the answer to dessert at the company Christmas party and as a thank-you to Santa when he stops by. While some kids might be participating just to lick the batter off the spoon, others will have fun decorating their sweet creations.

Gingerbread House

Ingredients

Gingerbread: 1/2 cup butter, 1/2 cup dark brown sugar, 1/4 cup light molasses, 1 tablespoon cinnamon, 1 tablespoon ground ginger, 1 1/2 teaspoons ground cloves, 1 teaspoon baking soda, 2 cups all-purpose flour, 2 tablespoons water

Royal icing: 3 3/4 cups powdered sugar, 2 large egg whites, 1 teaspoon lemon juice

Decorations: gumdrops, licorice, peppermint, chocolate chips, candy-coated chocolates

Directions

Mix together the butter, brown sugar, molasses, cinnamon, ginger, cloves and baking soda in a large mixing bowl until it is a smooth consistency. Blend the flour into the mix and chill it for 30 minutes until firm. Preheat the oven to 375 degrees. Roll the dough out on a cookie sheet and cut out the shapes of the house with a knife. Bake the shapes for 15 minutes until firm. When you take the cookie sheet out of the oven, retrace your shapes with a sharp knife while they’re still somewhat soft. Let the cookies continue cooling while you make the royal icing, the “glue” that will hold the house together.

To make the royal icing, you’ll simply mix all of the ingredients together with an electric mixer. The consistency should be smooth and thin enough to pass through a pastry bag. If the icing is too thick, add more lemon juice and mix again.

When the icing is finished and the gingerbread cookies are completely cool, start putting the house together. Begin with the walls of the house and then add the roof on at the end. With each addition, make sure the icing is completely dry before adding a new piece. After the corners of the house are dry and stable, you can begin decorating it. Once again, you’ll be using the royal icing as your glue to attach whatever edible decorations you please!

P.S. You can use this same recipe to make classic gingerbread men. Instead of cutting out a house template from your rolled-out dough, you’ll cut out gingerbread men using a cookie cutter!

Sugar Cookies

Ingredients: 

3 cups all-purpose flour, 3/4 teaspoon baking powder, 1/4 teaspoon salt, 1 cup unsalted butter, 1 cup sugar, 1 beaten egg, 1 tablespoon milk, icing, sprinkles, other edible decorations

Directions: 

To make the dough, begin by combining the flour, baking powder and salt. Next, beat together the butter, sugar, egg and milk. Gradually add the flour mixture. Wrap the dough in wax paper and refrigerate it for two hours. Preheat the oven to 375 degrees. After the dough has chilled, roll it out with a rolling pin. You can sprinkle the rolling pin with powdered sugar so the dough doesn’t stick to it. Cut the dough into your desired shapes and place them one inch apart from each other on a baking sheet. Bake the cookies for seven to nine minutes until they begin to brown around the edges. Remove the cookies from the oven and let them cool, first on the baking sheet and then on a wire rack. Once the cookies are cool, decorate them with various Christmas motifs using icing, sprinkles and other edible decorations.

GOODIES TO GIVE

The following recipes are a little more demanding, but the results make wonderful gifts. Place these treats in a small tin, mason jar, cellophane baggie or decorated takeout box to give them to your nearest and dearest. Give the treats to co-workers and your kids’ teachers, or present them as a hostess gifts or party favors!

Fleur de Sels Caramels

Ingredients

Vegetable oil, 1 1/2 cup sugar, 1/4 cup light corn syrup, 1 cup heavy cream, 5 tablespoons unsalted butter, 1 teaspoon fleur de sel, 1/2 teaspoon pure vanilla extract

Directions

Begin by lining an 8-inch square baking pan with parchment paper and brushing the paper lightly with oil. First, you’ll combine the sugar, corn syrup and 1/4 cup water in a saucepan. Boil the mixture until it is a golden brown. In another small pot, simmer the cream, butter and fleur de sel over medium heat. Once the sugar mix has turned golden brown, add in the cream mixture slowly. Stir in the vanilla and cook on low heat for 10 minutes. Next, pour the caramel into the parchment paper-lined pan.

Refrigerate it for a few hours until the mixture is firm. When the caramel is cold, remove it from the pan and put it on the cutting board. Cut the caramel into small, bite-size squares and sprinkle them with additional fleur de sel. Wrap each candy individually using parchment paper and either store them in the refrigerator for yourself or package them and gift them to others!

Peppermint Bark

Ingredients

12 oz. semisweet chocolate chopped into small 1/2-inch pieces, 1 pound white chocolate chopped into 1/2-inch pieces, 1 1/2 teaspoons peppermint extract, three crushed candy canes

Directions

First, line a baking dish with aluminum foil, shiny side is up. Next, heat 1 inch of water in a saucepan over low until it steams. Separate out 3/4 cup of semisweet chocolate and put the rest in a heatproof bowl. Place the bowl over the pan of steaming water and stir until it’s partly melted. Gradually stir in the remaining 3/4 cup of semisweet chocolate until all of it’s melted. Once melted, remove the bowl from the steam and wipe off the bowl. Stir 3/4 teaspoon peppermint extract into the chocolate and the pour the chocolate into the baking dish. Let the semisweet chocolate set for 10 minutes.

While the semisweet chocolate cools, perform the same melting process with the white chocolate. Once the white chocolate is completely melted, stir in 3/4 teaspoon of peppermint extract and pour it over the semi-sweet chocolate layer evenly. Lastly, you’ll sprinkle the white chocolate layer with crushed candy canes and let cool at room temperature for an hour. Once dry, break the bark out of the baking dish and store it in a decorative Christmas tin for all to enjoy!

Merry Christmas from my family to yours!

Bree


Seasonal, Winter

Christmas crafts for the entire family

christmas craft

Bree here, from Home Zone Furniture.

The most wonderful time of the year is finally here! Invite the excitement and joy of the holidays into your home with a few simple Christmas crafts. Not only will these crafts help keep the kids busy while they’re on winter break, but you’ll be able to decorate the house with their finished products. From ornaments to popcorn garlands, these are our favorite crafts to get you—and the kiddos—into the holiday spirit!

Chalkboard Ornaments

Materials:
Wooden shapes, chalkboard paint, chalk, string, jingle bells, hot glue

Directions:
First, paint the small wooden shapes with chalkboard paint. Once the paint has dried, use chalk to write a line from your favorite Christmas carol or draw a few Christmas motifs. Next, cut 6 inches of string, tie it in a knot so it makes a loop, and hot glue it to the back of the ornament. Dress the ornament up by hot gluing a few jingle bells onto it!

Oversized Window Ornaments

Materials:
Poster board, scissors, scrapbooking paper, glue, string or ribbon, hole punch

Directions:
Oversized window ornaments are the answer for decorating both inside and out. First, cut several different ornament shapes out of the poster board. They can be as long and wide as you like. I tend to cut shapes that are between 8 and 12 inches tall so they make a visual impact. Next, cover the ornament cutouts front and back with scrapbooking paper. Metallic paper or foil works nicely, too! Lastly, hole punch the top of the ornaments and hang them using different lengths of string or ribbon. You can hang them in the window or even in a doorframe.

Christmas Corsage

Materials:
Ribbon, felt, pin, jingle bells, scissors, hot glue gun or needle and thread

Directions:
Everybody likes to get dressed up during the holidays, and a Christmas corsage is the ideal complement. First, cut out a shape (circle, star, Christmas tree, etc.) from felt that’s about 3 inches in diameter. Decorate the felt shape using ribbon, jingle bells and smaller felt shapes. When the decorations are either hot glued or sewn onto the base felt shape, use a pin and tack the corsage onto a jacket lapel, dress or sweater.

Popcorn Garland

Materials:
Bowl of plain popcorn and/or cranberries, waxed floss, needle

Directions:
Garlands of all types read Christmas time! My favorite trick for making a holiday garland is to use waxed floss as opposed to string. Not only will the floss easily glide through the popcorn, but it will hold well, too! To make a garland, you’ll begin by threading a needle with the floss and tying a thick knot at the other end. With a bowl of popcorn and/or cranberries at your side, you will thread pieces one by one until the entire length of floss is full. Fresh garlands can decorate the indoor tree, a mantle or the dining room for Christmas dinner. Keep in mind that a fresh garland serves as a temporary indoor decor. Popcorn, etc., can attract pests, so after a day of use, transfer the garland to an outdoor tree. The local birds and squirrels will be pleased!

Paper Snowflakes

Materials:
Cardstock or poster board, scissors, string, hole punch, markers or paints, loose glitter, template for star or snowflake shapes

Directions:
Paper stars or snowflakes are the quintessential Christmas craft! Not only are they fun for kids of all ages to make, but you’ll also find that you can decorate any room with them. The classic approach to making paper snowflakes is to fold a square piece of paper into four and cut out tiny shapes leaving the central binding corner intact. When you open it up, you have a unique snowflake.

Take this idea to the next level using a slightly stronger material. Since cardstock and poster board are too thick to fold into four, use a template and cut out a Christmas shape of your choice. You can stick with snowflakes or try stars or Christmas trees. When the shapes are cut out, you can either leave them blank or decorate them using markers, paints or glue and loose glitter. Once it’s dry, hole punch it at the top and loop it with a piece of string.

There are many uses for paper snowflakes. You can use them to decorate your mantle, personalize your gift wrapping or suspend them from the ceiling to create a winter wonderland.

What are your favorite Christmas crafts? Tell me about them in the comments below!

Bree

Seasonal, Winter

Styling the perfect holiday mantel

styling the perfect holiday mantle

Bree here, from Home Zone Furniture.

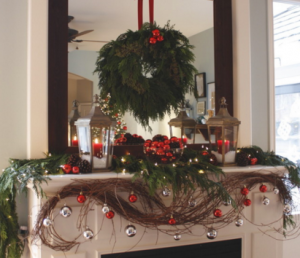
The gourds are gone, the tree has been dressed, but has the mantel been styled? At our house, the mantel is the crown jewel of our holiday décor. While the pressure to bring holiday cheer to this architectural centerpiece is hard to deny, don’t get overwhelmed! Use creative styling, prioritize what you like, and you’ll find that the finished product is a reflection of you and your family. Use these simple, budget-friendly ideas to get inspired. 

Blank Slate

The first thing you’ll need to do is clear your mantel completely. Take down any picture frames, and remove flower vases and candles. If you plan on using greenery and have a wooden mantel, I’d suggest taping down some plastic to protect the surface. You might also consider temporarily removing anything hanging above the mantel, such as a painting or mirror, in case it interfere with your holiday décor.

Accents

There are all sorts of ways you can fill your mantel with holiday spirit. One of the most popular accents is garland. You can find fresh garland in several varieties, but I always lean toward an evergreen. As for garland length, you’ll want to get one that is the length of your mantle plus a few inches on either side (at least!). For a more dramatic and aromatic effect, measure so that your garland pools on the floor on either side of the hearth. To keep your garland in place, tack it down in the center and let it hang freely on the sides. 

Don’t care for the upkeep of fresh garland? You can also purchase an artificial version, which you’ll be able to use again next year. For those who prefer a more organized-looking mantel, get creative with ornaments. A few clear bowls filled with colorful bulbs will pack a visual punch and stay neat and tidy. There’s no need to buy brand-new ornaments either. When you’re done decorating your tree, you can use the ornaments you didn’t hang or even repurpose those that are partially broken. 

Stockings

Stockings are a must on a holiday mantel. If you’re unsure of where to go with your mantel styling, the stockings can be a great place to start. For instance, burlap stockings read rustic, while velvet stockings project elegance. Once you have your stockings picked out, hang them evenly across the length of the mantel. Stockings can be hung on decorative hooks that are in keeping with the style of the rest of your room or on hooks covered by your garland, out of sight. 

Florals

Bring some additional color to your mantel with a few floral additions. Start by sticking some stems into the underlying garland—a few sprigs of holly are sure to make your mantel a real eye-catcher! Another way to incorporate florals is to fill small, short vases with flowers that pack a major punch. Tightly arranged roses in round glass vases spread across the mantel make for a lovely visual! 

Candles

Candles are a necessity on a holiday mantel. Not only do they create the perfect mood lighting, but they can add a pleasing scent as well. Begin by adding a candle with a large base to either end of the mantle. I’d suggest using unscented versions for these base candles so you don’t get tired of the smell as the holiday season wears on. The anchor candles can be placed on an unobtrusive porcelain or silver plate to catch the wax or can be placed inside hurricane lamps to create more of a glow. Add smaller candles to your mantel for additional light, scent and holiday cheer.

Personal touches

No matter how much you customize your mantel, it won’t feel like your own without a few personal touches. You can display a few of your favorite holiday cards, either tucked into the garland or glued onto a stretch of ribbon. The mantel is also a great way to show off kids’ crafts. For instance, you can cut out snowflake shapes from poster board, cover them in rubber cement and sprinkle them with glitter. Again, you can tuck snowflakes into the garland or hang them off of the mantel using twine. 

However you decide to proceed, here’s to your most beautiful holiday mantel yet!

Bree