Browsing Tag

Decor

Seasonal, Winter

Styling the perfect holiday mantel

styling the perfect holiday mantle

Bree here, from Home Zone Furniture.

The gourds are gone, the tree has been dressed, but has the mantel been styled? At our house, the mantel is the crown jewel of our holiday décor. While the pressure to bring holiday cheer to this architectural centerpiece is hard to deny, don’t get overwhelmed! Use creative styling, prioritize what you like, and you’ll find that the finished product is a reflection of you and your family. Use these simple, budget-friendly ideas to get inspired. 

Blank Slate

The first thing you’ll need to do is clear your mantel completely. Take down any picture frames, and remove flower vases and candles. If you plan on using greenery and have a wooden mantel, I’d suggest taping down some plastic to protect the surface. You might also consider temporarily removing anything hanging above the mantel, such as a painting or mirror, in case it interfere with your holiday décor.

Accents

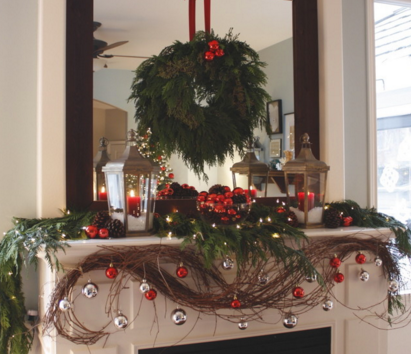
There are all sorts of ways you can fill your mantel with holiday spirit. One of the most popular accents is garland. You can find fresh garland in several varieties, but I always lean toward an evergreen. As for garland length, you’ll want to get one that is the length of your mantle plus a few inches on either side (at least!). For a more dramatic and aromatic effect, measure so that your garland pools on the floor on either side of the hearth. To keep your garland in place, tack it down in the center and let it hang freely on the sides. 

Don’t care for the upkeep of fresh garland? You can also purchase an artificial version, which you’ll be able to use again next year. For those who prefer a more organized-looking mantel, get creative with ornaments. A few clear bowls filled with colorful bulbs will pack a visual punch and stay neat and tidy. There’s no need to buy brand-new ornaments either. When you’re done decorating your tree, you can use the ornaments you didn’t hang or even repurpose those that are partially broken. 

Stockings

Stockings are a must on a holiday mantel. If you’re unsure of where to go with your mantel styling, the stockings can be a great place to start. For instance, burlap stockings read rustic, while velvet stockings project elegance. Once you have your stockings picked out, hang them evenly across the length of the mantel. Stockings can be hung on decorative hooks that are in keeping with the style of the rest of your room or on hooks covered by your garland, out of sight. 

Florals

Bring some additional color to your mantel with a few floral additions. Start by sticking some stems into the underlying garland—a few sprigs of holly are sure to make your mantel a real eye-catcher! Another way to incorporate florals is to fill small, short vases with flowers that pack a major punch. Tightly arranged roses in round glass vases spread across the mantel make for a lovely visual! 

Candles

Candles are a necessity on a holiday mantel. Not only do they create the perfect mood lighting, but they can add a pleasing scent as well. Begin by adding a candle with a large base to either end of the mantle. I’d suggest using unscented versions for these base candles so you don’t get tired of the smell as the holiday season wears on. The anchor candles can be placed on an unobtrusive porcelain or silver plate to catch the wax or can be placed inside hurricane lamps to create more of a glow. Add smaller candles to your mantel for additional light, scent and holiday cheer.

Personal touches

No matter how much you customize your mantel, it won’t feel like your own without a few personal touches. You can display a few of your favorite holiday cards, either tucked into the garland or glued onto a stretch of ribbon. The mantel is also a great way to show off kids’ crafts. For instance, you can cut out snowflake shapes from poster board, cover them in rubber cement and sprinkle them with glitter. Again, you can tuck snowflakes into the garland or hang them off of the mantel using twine. 

However you decide to proceed, here’s to your most beautiful holiday mantel yet!

Bree 


Fall, Seasonal

How to repurpose your Halloween pumpkins

how to salvage your halloween pumpkins

Bree here, from Home Zone Furniture.

From costumes to candy to decorations, Halloween can be a surprisingly expensive holiday. Instead of tossing out Halloween-themed items as soon as the last trick-or-treater departs, find a way to reinvent them for Thanksgiving. Sure, faux gravestones and giant spiders might not make it past October 31, but the classic pumpkin can be easily repurposed for Turkey Day!

DÉCOR

The most obvious way to reuse Halloween pumpkins is to incorporate them into your home’s holiday décor. Unfortunately, pumpkins that have already been carved will start to rot within a week, but uncarved ones will make festive accents for Thanksgiving.

Doorstep. Keep your entryway decorated through November with a chic display of pumpkins and decorative gourds on either side of your door. To keep the pumpkins from rotting, coat them in a sealant or paint them the color of your choice.

Centerpiece. While larger pumpkins are best left outdoors, small pumpkins and other gourds you purchased pre-Halloween make a lovely Thanksgiving centerpiece. You can either group them together organically or arrange them in a large bowl. If you want to save room on the dining room table for serving platters, you could use this display approach in the family room or wherever guests will congregate before or after Thanksgiving dinner.

FOOD

As the Internet has taught us, people are crazy about pumpkin-flavored food and drinks. Why fight it? This Thanksgiving, treat your guests to delicious pumpkin recipes.

Pumpkin Latte

Why buy a pumpkin-flavored drink, when you can make one yourself with genuine pumpkin?

Ingredients: milk; coffee; a spice blend of cinnamon, ginger and nutmeg; maple syrup; pumpkin puree; vanilla extract

Directions:

  1. Heat 3/4-cup milk on the stove.
  2. Add 1/4 teaspoon of spice mix, 1 teaspoon of vanilla extract, 1 teaspoon of maple syrup and 1 teaspoon of pumpkin puree; stir.
  3. Heat mixture on medium heat.
  4. Brew coffee or espresso.
  5. Remove milk and spice mixture from stovetop before it boils and froth it using a milk frother or blender.
  6. When milk is frothed, combine it in a mug with the coffee or espresso.
  7. Top with a dollop of milk foam and add a pinch of spice mixture or cinnamon stick for garnish.

Pumpkin Seeds

Most pumpkin recipes instruct you to use the meat of the pumpkin and to discard the pesky seeds, but pumpkins seeds are a tasty (and nutritious!) snack on their own! Whether you set them out in a bowl for your guests nibble pre-Thanksgiving meal or you put them in mason jars as parting gifts, pumpkins seeds are a crowd-pleasing snack.

Directions:

  1. Separate the seeds from the orange meat of the pumpkin and wash them meticulously.
  2. Optional: Boil the seeds in salt water for 10 minutes to make them extra crispy and easier to digest. After they boil, drain them in a colander and pat them dry with a tea towel.
  3. Spread the seeds in one layer on a baking sheet, drizzle them with extra virgin olive oil and sprinkle them with kosher salt.
  4. Roast the seeds on a cookie sheet for 20 minutes at 325 degrees Fahrenheit, stirring them about halfway through.
  5. Remove from the oven and sprinkle them with the seasoning of your choice. From classic salt and pepper to savory chili powder, you can’t go wrong!

Serving Bowl

You could always recycle your large pumpkins by turning them into a DIY Thanksgiving serving bowl. Carve out the insides prior to use, line the interior with foil or plastic wrap and fill the pumpkin cavity with one of your side dishes. It makes for practical and decorative presentation!

GARDEN

Your backyard or garden is a logical place for post-Halloween pumpkins to end up. If the weather is nice on Thanksgiving, you might invite your guests to congregate outside, so it makes sense to have the area spruced up and decorated accordingly.

Pumpkin Planter

Large pumpkins serve as lovely temporary planters. I’d suggest you try this craft just prior to Thanksgiving because a carved pumpkin will disintegrate quickly!

Directions:

  1. Cut the top off of the pumpkin and scoop some of the insides. Unlike the pumpkin serving bowl, a pumpkin planter doesn’t have to be completely cleaned out and lined.
  2. Fill the empty space inside the pumpkin with nutrient-rich soil.
  3. Situate your plant of choice inside the dirt-filled pumpkin.
  4. At first, you can place the pumpkin planter on a porch or near a doorstep, but after a week, go ahead and put it in the soil or a flowerbed so it can naturally break down without making a mess!

Pumpkin Bird Feeder

Extend your Thanksgiving feast to the birds and squirrels in your yard with an easy DIY pumpkin bird feeder.

Supplies: 3- to 5-lb. pumpkin, sturdy twigs, twine and birdseed

Directions:

  1. Cut the top off the pumpkin and scoop out the insides, leaving a 1- to 2-inch-thick wall.
  2. Poke holes in the side of the pumpkin and insert twigs to make perches.
  3. Hang the feeder by knotting two lengths of twine in the center, and tack it down in the bottom of the feeder.
  4. Fill the feeder with birdseed and watch the birds go to town!


Decor, Living Room Ideas

How to pick the perfect coffee table for your space

Bree here, from Home Zone Furniture.

The coffee table is the anchor of any well-designed living area, and it also allows you the chance to introduce a completely different style, texture or shape into a room that’s otherwise cohesive. But it can be a little daunting to pick out the perfect coffee table when there are so many options, especially when the rest of your room is already put together.

For those of you feeling lost, use these tips to help you find the ideal coffee table for your taste and your space.

Measure

Start with the golden rule of interior design: measure, measure, measure! The rules of how tall or long a coffee table should be in relation to the rest of the room can be bent somewhat, but measuring is still the best place to start. There should be approximately 18 inches between the edge of the sofa and the edge of the table. It’s the ideal length to be able to set a drink down and stretch your legs out comfortably. For optimal TV viewing distance, there should be at least 30 inches from the outer edge of the TV stand to the coffee table. In relation to the height of the couch, your coffee table should be 2 inches lower than the seated portion.

Shape

Once you have an idea of how big or small your coffee table should be, let’s talk shape. While larger tables such as the dining table are dependent on the shape of the room, coffee tables are more of an accent piece, allowing for a variety of shapes. A rounded table is best for those with kids (no sharp edges!) and even works well in small spaces. Another way to deal with a small room is by going with a clear table made from glass or Lucite. It gives the illusion of a larger space. I suggest a square or rectangular coffee table if you have a large room to fill or if curved lines dominate the room. Part of the fun of interior design comes from playing with shape, texture and size!

Purpose

The purpose of the coffee table depends on the room in which it’s placed. Will it be in the formal living room or the family room? If you’re looking for a piece for the casual family room, you might consider a coffee table with a little bit of storage to stash things like magazines, remotes and games. You’ll want a durable material that can withstand feet and drippy drinks sans coasters. A formal living room coffee table, on the other hand, can be a little more delicate. No hardy materials or excess storage needed here! Once you decide on the purpose of the piece and how your family functions in the space it’s in, perhaps you’ll discover one central coffee table doesn’t even make sense. Maybe several small end tables would better suit your needs.

Style

Choosing the style is the fun part of the process. My favorite living rooms are those with tables that stylistically contrast the rest of the room. If your couch is heavy and cumbersome, choose a coffee table that’s light and delicate. Or a heavy wooden table can offset a small, feminine couch. If your room is simple, perhaps minimalist or modern, try adding an ornate coffee table to diversify your décor. For an eclectic look, don’t be afraid to go with a table that isn’t a coffee table per se. A steamer trunk, cedar chest or ottoman can be a great alternative to a traditional coffee table. If the surface is uneven or permeable, place a tray on top to hold your essentials.

Good luck!

Bree


Seasonal, Summer

DIY summer: Crafts using recycled materials

Bree here, from Home Zone Furniture.

As the dog days of summer drag on, you’re probably looking for things to do indoors to keep busy. Use this time wisely, combing through your home for unused or underutilized items that can be repurposed into something practical. Not only will this help eliminate clutter, but also you’ll end up with some new household items at very little cost.

Cereal Box Organizer

Get your kids geared up for the school year with this easy organizational tool incorporating cereal boxes. Cut the box with a utility knife at the height and angle of your choice. You can cut the box horizontally or at a 45-degree angle from the top corner of the box to the middle of the opposite side for a shape that resembles a file organizer or magazine holder. Wrap a piece of colored contact paper around the cut box to add some color and texture to a desk or shelf space. The contact paper can be secured to the box with double-sided tape, and the excess can be easily trimmed with a pair of scissors.

Teacup Candles

This craft adds a vintage vibe to any tablescape. Melt down old candles in a double boiler, keeping the temperature at about 185 degrees. Remove the old wicks with tongs. Cut a piece of wick that’s two inches longer then the height of the teacup you plan to use. Tie one end of the wick to a wick sustainer and the other around a skewer. Dip the wick and sustainer into the melted wax to coat them, then stick the sustainer to the bottom of the cup. Next, pour the melted wax into the cup, stopping a half-inch below the cup’s rim. Allow the wax to set for an hour, and you’ll have new candles in no time!

Gilded Vases

In my opinion, you can never have too many flower arrangements in your home. Kick up your vase game with this luxe DIY project using recycled glass jars. Using a foam brush, apply glue to the outside of the jar in irregular patches. When the adhesive has set, press on sheets of gold leaf. Finally, rub away excess pieces with a paper towel for jars with a unique patina that are perfect for inside or out.

Table Protector

There are all sorts of recycled coaster ideas out there, but this one is my favorite because it’s easy and chic. A table protector is a must-have, especially if you have a wooden dining table or side tables. Start by disassembling 40 clothespins and laying them flat side down. Next, drill a hole into each a half inch from the tapered end. Thread floral wire through the pins with the double-notched side of the pin facing right. Finally, pull the wire into a circle and twist the wire ends to secure the shape.

Book Box

I don’t know about you, but I find our TV remote control to be a complete eyesore. Disguise this unsightly (yet necessary) household item by hiding it in a book. You heard me! First you’ll need a book that’s two inches longer and a quarter inch deeper than the remote. Coat the inside cover of the book’s back cover and the facing page with glue using a foam brush. Close the book and press down for 10 seconds. Next, open the front cover and coat the entire stack of pages (all three exposed sides) with glue, carefully avoiding the top page. Let this dry for an hour, repeat the process, then weight it and let it dry overnight. The next day, open the front cover, center the remote on the first page, trace it with a pencil and add quarter inch all around. Cut the marked line with an X-Acto knife, removing a few pages at a time. Continue cutting until the remote fits inside comfortably. The final step is to cut a piece of ribbon that’s half the length of your book plus five inches. Hot glue one end to the bottom center of the hollowed out area. Once this dries, you’ll be able to easily remove the remote from the book with a gentle tug on the “bookmark.”

Who knew recycling could be so much fun?

Bree

Bedroom Ideas, Decor

Keep Your Child’s Room Organized With These Kids Bedroom Ideas

It doesn’t take long for a child’s bedroom to fill up and look messy with their precious items, such as toys, books, artwork, and rock collections. However, with well-organized kids bedroom and creative room design ideas, you can minimize clutter and create a warm and inviting space where your child will enjoy playing, relaxing, and sleeping. With our kid room organization tips, you can also easily keep track of everything and spend less time searching for a missing sock, shoe, or backpack.

The Importance of Having an Organized Child’s Bedroom

While you may want to know how to organize your kid’s room to benefit your home appearance and overall mental health, there are also numerous advantages for your child. A tidy and clutter-free space can create a stimulating and healthy learning environment and help your child stay mentally focused. For example, they can readily know where everything is located, including school supplies. Therefore, they are more likely to remember and tackle tasks such as homework or indulge in creative play. Additionally, when you work together to organize your kid’s room, you can teach them about responsibility and taking care of their belongings, which can encourage self-discipline and boost their self-esteem.

Kids Bedroom Organization Tips

With an innovative kids bedroom layout, functional furniture, storage, and decoration, you can easily create a space that looks warm, inviting, and tidy. 

Declutter

Before you start searching for kids room ideas, such as how to decorate the space, you should declutter and get rid of anything your child no longer needs. Remove trash, including broken toys, loose scrap paper, unwearable clothes, and damaged books. Be sure to check under beds and in the drawers and closet to ensure there is nothing you missed. Once you clear out the trash from the space, you can further declutter your kid’s room by removing clothes that no longer fit and toys they have outgrown. You can donate any items in good condition or put them into storage if you intend to pass them down to your younger kids. 

Sort and Organize

Creating functional zones is one of the best kids bedroom ideas for sorting your space. This tip is ideal if you have a small room, and ideas include organizing books to create a reading nook in the corner, keeping soft toys readily accessible near the bed for nighttime, and arranging paper and pens on a desk ready for art or homework. If your child has a small kids room, consider ideas and kids room furniture that utilize your wall space, such as a bookshelf or hanging baskets to organize their treasures. 

Invest in Multifunctional Furniture 

If you’re organizing a small room or toddler bedroom, ideas for furniture should include versatile pieces. Multifunctional furniture has a dual purpose: it can transition with your child as they grow, and it can save you money and space. For example, beds with drawers underneath are ideal for storing toys as they are kept out of the way yet readily accessible. As your child gets older, you can store clothes and shoes in the drawers. 

Creative Storage Solutions 

Kids room ideas should always include ample storage solutions that are easy for your child to access. Baskets and storage boxes are ideal for toys since your child can quickly drop everything in them when tidying up. Ottomans and bookshelves are another way to store large items in your kid’s room, while trays on top of dressers can keep small knickknacks looking tidy and prevent them from getting lost. 

Decorate With Purpose 

While classic and neutral-colored furniture is excellent to include in your toddler room ideas, mixing in some eye-catching accent pieces you know your child will love is just as important. You can readily add color to cool room designs with cushions in their reading nook or a throw blanket on their bed. A chest of drawers with a textured front or a patterned accent chair can also add interest to a space. For kids bedroom ideas that add interest yet reduce clutter, consider decorative and functional pieces. Other ideas for decorating your kid’s bedroom include using creative labels for your containers or hanging artwork on the walls to keep the floor clear. 

Teach Your Kids the Importance of Putting Things Away 

Organizational ideas for kid bedrooms are only as good as your child’s willingness and ability to use the storage solutions and furniture. Ensure you implement uncomplicated room design ideas and encourage your child to put things away in the correct place once they have finished using them. 

Maintain Regular Decluttering Sessions 

Wondering how to keep your kids’ rooms clean after organizing them? Regular decluttering every season is essential to preventing the buildup of trash, broken toys, and old papers. However, by placing storage furniture in an organized room, regular decluttering should take minimal time and effort. 

Find Kids Bedroom Furniture at Home Zone Furniture

You can readily sort and organize your kid’s room with our ideas and furniture suggestions to create a space that your child loves. We have an extensive range of bedroom furniture, storage beds, baskets, shelves, and home accents, making it effortless to find the perfect items for your home. For more kid bedroom ideas or assistance selecting the perfect furniture to suit your home, contact our friendly and knowledgeable team or visit your local Home Zone store.

Find a Home Zone Furniture Store in Texas Near You

Mesquite, TX | Richardson, TX | Hudson Oaks, TX | Cedar Hill, TX | Lewisville, TX | North Lewisville, TX | Arlington, TX | Allen, TX | North Richland Hills, TX | Denton, TX | Fort Worth, TX | Burleson, TX | Lake Worth, TX | Hudson Oaks, TX | Waco, TX